Tuesday, November 5, 2013

November 5

Winter is around the corner and it is time to revisit some of the information I gave you last year. If you have been reading my blog, you know that I posted a number of articles last fall on getting ready for the winter.  So rather than repeating myself, I thought I should give you a summary and tell you where to get more information.

You should have already brought your houseplants into a protected area with the intent of taking them inside. There are two postings from last September that are good references for bringing your plants back in as well as saving some of your favorite garden plants through cuttings. 

Green For Christmas

Begonias are easy plants to start from
cuttings and will root quickly
New plants from cuttings are inexpensive Christmas gifts and now is the time to get them started.  Even friends with 'not to green thumbs' love to get plants as gifts, especially if it is from someone whose gardening skills they admire. The post entitled Saving Your Favorites tell you how to make a Propagation Container to created new plants from cuttings. Choose something that they have admired in your home and trim just below a leaf nod. You will need at least one remaining leaf and one nod with leaf removed for a good cutting. The not with the leaf removed will be buried in your potting medium. Here is a link to a diagram showing the Parts of a Plant. You can see that the nod is where the leaf has emerged from the stem.  The bud right above the leaf is where the root will emerge. The amount of time to get a good root is between 4 to 6 weeks so don't wait. Of course you could use the new plants as boxing day gifts or if you want a little more show, start now for spring.

Red for Christmas

The poinsettias you saved from last year should be placed in a spot that will give them a full 10 hours of darkness.  They can take up to 7 weeks to develop buds. My favorite trick is to place the plant in the closet when you get home from work around 6 or 7 P.M. and take it out on you way to work around 6 or 7 A.M.  Check out my January posting So what are you going to do with your poinsettia now? for more detail.


The Legend of Poinsettias

A charming story is told of Pepita, a poor Mexican girl who had no gift to present the Christ Child at Christmas Eve services. As Pepita walked sorrowfully to church, her cousin Pedro tried to console her. "Pepita," he said, "I am certain that even the most humble gift, given in love, will be acceptable in His eyes." Pepita gathered a bouquet of common weeds from the roadside, for this was the only gift she could give. As she entered the chapel and approached the alter, her spirits lifted. Forgetting the humbleness of her gift, the girl laid the weeds at the feet of the Christ Child. Suddenly, Pepita's ordinary weeds burst into brilliant red blooms! This miraculous event was named the Flores de Noche Buena, or Flowers of the Holy Night. Today, we call these flowers poinsettias.

Today, Poinsettias come in a variety of colors and patterns and new ones are introduced every year.  Some of my favorites are Jingle Bells, Merry Christmas 2, Lemon Drop and Pink Elf.  Keep an eye out for them to shake up the usual at Christmas.


More Color, Give Me More Color

You should be feeding your Holiday Cactus as they are getting ready to put on their show.  Plant your Amaryllis Bulbs and your Paperwhites. If you haven't kept any bulbs from previous years, give yourself an early Christmas present.  These also make great hostess gifts for Thanksgiving. December 2012 postings will give you more information along with some great links on how to start and care for these plants.  

That's all for today.  Please comment on this post and tell me what you think. If I can help with any plant questions post them below or email me at houseplantsos@gmail.com . 

Sincerely,
k.k.jones


Saturday, October 12, 2013

Cats and Houseplants

I came across a Pinterest called "cats in the garden" that I really love to follow.  It is all pictures of different cats as they coexist in people's garden and I thought that cats are a good subject for this special post.  Many people will tell you that cats and houseplants just don't mix.  I can't disagree more. You just have to know how to protect your house and plants just like you would if you had children.

First there is the digging 

It is a natural instinct for a cat to think that the any loose dirt is a potty box.  So how do you get them to stop? First be sure that the litter box is always a clean choice.  Next make your plants a less inviting choice.  The best way is to cover the soil.  An aluminum foil cover for the soil is the cheapest and fastest.  All you have to do is cut a circle the same size as the top of you pot, cut a hole in the center to allow the plant to emerge from the center and place in pot.  It might not be the most organic look but it gets the job done. You can also plant a ground cover like you would in the garden.  Baby's Tears (Soleirolia solerolii) is a nice choice, as well as thyme or moss.  Another option is mulch.  Cats do not like the smell of cedar or eucalyptus so these will keep them out of the plants.  This only works if you can tolerate the smell and you remember to refresh the mulch when it loses it scent.  The one that works best for me is a pebble mulch.  you can get small gravel for little plants and larger stones for floor plants.  AND the stones help to solve the next problem we want to talk about.

Cats like to climb

They also like to see out the same windows you want to use for your plants.  Since two objects cannot occupy the same space, one will have to move.  No cat owner can honestly say that they have never come home to a plant on it's side, dirt everywhere and a cat stretched out where the plant use to be.  The answer to this problem is to either make sure there is room for the cat and/or make the plant too heavy for the cat to move.  Get were the stones come in?  But that is not enough.  Make sure you have some weight in the plant's pot so that it does not become top heavy.  If you are using plastic pots, then you might want to put some heavy rocks in the bottom of them. The best solution is a plastic grow pot inside a beautiful ceramic decorative pot that can add weight and encourage good watering practice.

Teeth marks?

The last thing to think about is that cats, especially indoor cats, like to chew on green plants. Besides having raggedy leaves on your beautiful plants, there is always a concern that your cat may chew on something that will make it deathly sick.  I mentioned some of these plants in the post entitled "Is It Poisonous" and you might want to reread it.  The good news is that cats are trainable and as long as you give yours a plant it can chew on, it will stay away from the others.  Start the training as soon as you introduce your cat to your house.  Give your new cat a plant.  The one I have used for years is that green filler you buy in the spring for your container planting.  Its common name is an Asparagus Fern and will live for many years before the stems becomes hard and not tempting to chew.  It has nice long soft stems and you can encourage the cat to grab it by playfully dangling the leaves over its head.  Now you have established that it is okay to chew on this plant. When you see your cat display an interest in another plant, take it to the designated plant and show again that this plant is the one to chew. You will be surprised how quickly your cat will learn. Because of the inquisitive nature of cats, you may find that you will have to repeat this lesson with each new plant brought into your cat's world but the older your cat gets the less problem you will have.

I hope that this post will help you deal better with you mischievous roommate.  If you have any other questions or problems please forward them to me at houseplantsos@gmail.com or just add in them to the comment section below.

Sincerely,
k.k.jones


Sunday, September 29, 2013

Location, Location, Location

Location is Everything


Every good real estate agent will tell you how important location is and every good gardener will tell you the same. The location of your plant is as important as the location of your house and micro climates are found everywhere. 
 

Micro Climates


For today's lesson, I present to you two plants that are in my garden. They are a common house plant in many parts of the country so they are a good choice to study. The one in the picture on the right is healthy and happy. You can see another in the background of that picture and its close up is on the left. They are both the same kind of plant. They were both cut down in the spring to bare stalks so that that both would grow at the same rate. How come the second plant is not doing well? 


They are less than three feet apart and one is just a little farther north. You can almost say they are planted in the same location. They got the same amount of water and food, so what was different? It took me a couple days to observe that though they were so close one got more sun.  The other was shaded only 20 minutes more by the large tree next door and that made all the difference.

So, What Does That Mean to You, an Indoor Gardener? 


Just think, if just 3 feet outdoors can create a completely different micro climate then how little space is need to change it indoors. The 36 inch window will have a shadier side; the tub of artificial light is brighter in the center than the ends.  Then there will be the outside factors.  The tree outside the window, the direction of the sun, the neighbor's fence, a lot can effect you best laid plans. 

So take a second look at the location you have chosen.  There can be many reasons for a plant not to do well.  Start with the things you can control.  Is it getting enough water?  Is there any sign of infestation by bugs?  Has it outgrown its location?  Then take a good look at the actual location.  What quality of light is being offered?  How is the heat?  Is it too close or too far from the source?  Could a breeze be causing damage?  Could it be the lack of breeze?   

It doesn't take a college degree to grow houseplants.  It only takes a little observation.  So keep  your eyes open and keep trying. Write me if you have any problems.

Reach me through this website or email me at houseplantsos@gmail.com

Sincerely,
k.k.jones


Wednesday, August 21, 2013

A Rabbit's Foot for Luck


Well it has been a while since I wrote and I apologize.  Summer is here and I have been out in the garden.  By now most of you have joined me and unless you are one of the many who only garden indoors, you probably did not even miss me.


I have a lot of things I have been gathering and lots pictures to help show you what I want you to know. I am starting today with a favorite of mine.  That is the Rabbit's Foot Fern (Davallia).


The Davallia fern is definitely not collected for its foliage but its growing habits makes it a "must have" for any person who wants something unusual.  The thing that makes it unique is that it would prefer not to have a pot and will continue to grow wrapping around itself or any other structure that will give it support.  The one above is in a wire basket with a little moss and bark chips to help keep it from drying out. Notice how  each rhizome looks like a little furry foot.  This is where this family gets it's name as footed ferns. 


The "fur" is small root hairs that help to hold water and allows this fern to tolerate lower humidity that most other ferns.  The one pictured is a Davallia fejeenisis (Rabbit's Foot Fern) which is the one that is the most common  in the US and can be bought in a small size at most garden centers. Other rather easy Davallia's are the canariensis, the pyxidata and the solida. Some of their common names are Hare's Foot, and Squirrel's Foot Fern. There are more Davallias that are more difficult and some that are even deciduous.  This means that they will lose their leaves in the winter and look like a large ball of roots. I would try to stay away from them if you are a beginner.

Water regularly in the summer when it is growing and then slow down in the winter when it goes into a dormant phase.  If your fern is in a basket with little or no medium, regularly may mean that you will need to mist a couple of times a week.  

When it is time to repot there are a few noteworthy rules to follow.  First and for-most: do not bury any root that has already exposed itself to the air. This is now an air root and will rot if buried.  Second: the potting medium should be course like you would use for an epiphyte orchid.  This allows the furry rhizomes to develop better.  Fertilizer is light and you can use a slow release or a half strength solution of a liquid formula.  

Pests to watch for are aphids, mealy bugs, scale and thrip. A good hosing or indoors a trip to the showers should take care of most infestations.

If you would like to know more about this fascinating plant check out  the Fern Society of South Australia, Davallia Study Group . Though I have owned Davallias over the years there is always something new to learn.  I thought it amazing that we usually buy our new plant in a plastic pot and this species does not like them.  Keep to the more porous pots.  If you cannot do a hanging basket because of the mess that is sometimes associated with it then use a clay pot.  

Well, that is all for today.  I hope this was worth the wait.  I promise that I will go back to writing more often.

Please direct any questions or comments to me in the comment area of this post or email me at houseplantsos@gmail.com.

Sincerely,
k.k.jones 


Wednesday, July 3, 2013

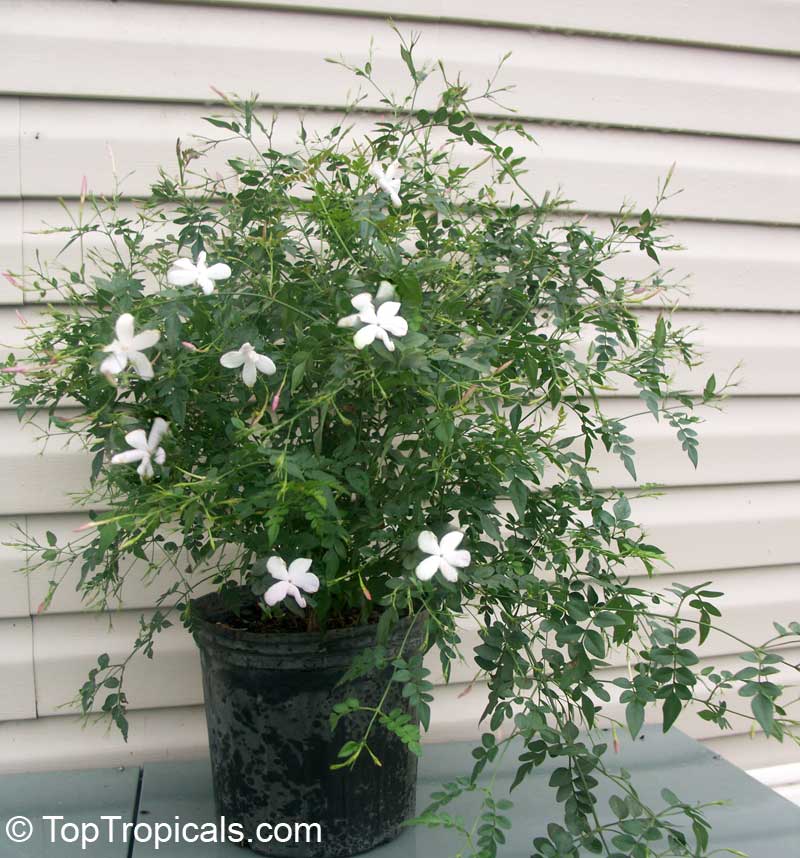
Jasmine for Jennifer

 One of my readers wrote that she had purchased a jasmine plant but could not get it to bloom.  So, here is probably the reason why.

How to Get a Jasmine to Bloom

Jasmine, though thought of as a tropical, like cooler temperatures.  To get it to bloom it will need night temperatures of around 40 degrees and day temperatures of 65.  This makes it a Spring bloomer naturally which also explains why my Jasmine is not in bloom and I had to borrow pictures from other sources.  I guess that means that your best bet to get your Jasmine to bloom now is to place it near the air conditioner.  

Jasmine also like sunny windows and are prime candidates for taking outside for the summer. The best time to prune is right after it has bloomed, as new flowers are formed on new growth.  Fall pruning may also cause you to miss blooms when it will re-bloom with the cooler temperatures.  

The Basic Care

I have already mentioned that the Jasmine likes a sunny location.  It will also do well under artificial light if you balance it with complete darkness.  Like most Spring and Fall flowering plants the amount of darkness they get helps to set the buds.

Watering is very important to this plant.  It should never be allowed to dry out.  Though you should be careful not to over water, this plant will do okay with a saucer to sit in.  

Fertilize lightly.  You should fertilize every other week with a half solution of low nitrogen fertilizer.  The nitrogen is noted by the first number in the fertilizer formula so a 10-20-10 solution would be best.  A 10-10-10 solution will do if you cannot find one, as this is a general formula for all plants. 

Hope this helps.  I will write again on the Jasmine and tell you more about it as there are 200 species. In fact when searching for a picture to put in this posting, I came across the picture of my "minature Gardenia" that I talked about in the posting "Catching Up On Odds and Ends". Looks like I will have to do a little more digging on that one.  If anyone knows which this is please write and I will share with others.

If you have any questions or pictures you would like to add to this blog please add to the comments or email me at houseplantsos@gmail.com.

Sincerely,
k.k.jones

Sunday, June 23, 2013

Isn't She A Beauty

Thank you Jennifer for sending me this beautiful picture of a Mandevilla.  This is a beautiful example of a small plant that can become very large as it vines its way up.  Jennifer, can you tell us how lod your plant is and do you keep it prunned to be sure that it does not get to big?

For those of you who have never seen a Mandevilla, this is a pink one and the easiest to find.  It also comes in white, red and yellow.  I will dedicate a posting on this plant soon.

Jennifer also sent me a second plant that was not in bloom but it is one of my favorites too.  It is a jasmine plant.  Unfortunately, my download failed.  Maybe we can get Jennifer to resend this picture and hopefully it will be in bloom. 

 Thanks again.

Coleus A Jewely In The Garden Or On The Window Ledge


The Coleus is a common name for the genus Solenostemon. Don't bother using its genus name because not many people will know what you are talking about.  I actually had to look it up.  It has a blossom that grows ain a spike form and is very small.  I personally think that it takes so much energy for a plant to create a bloom that unless it is outstanding it should be cut off.  This will also allow the plant to branch and encourages more growth.


Many of the Coleus we see today are hibrids with a large varity of pattern in colors of red, green and gold.  Take a look at the two Coleus below.  The one on the left is a fairly old leaf pattern and the one next to it is a newer one that appears to have been created from it.

Rosy Dawn Gardens calls this coleus
"Under The Sea Electric Coral"

Care of Coleus

New this year, this style of leaf
is a Hort'couture
Temperature:  All Coleus are tender.  This means that though you will see them in many gardens they will not survive a freezing temperature.  Because of this they make great houseplants.  They like temperatures above 60 degrees and will tolerate a low light situation.  

Light: In their natural habitat, Colus will be found in deep to dappled shade.  This makes them great for a window that gets little actual sun.  A little extra light will keep the foliage color more intense.  

Water: This plant likes to keep its roots moist but be sure you allow it to drain so that it does not drown.  

Pests: Coleus can become infested with the list of common bugs I talked about before.  If you have forgotten you can see them on my Pinterest Board. The posting on 5/9/2013 will help you with instructions on how to debug. One bug that I did not mentioned was the soil gnat or fungus gnat.  This is a tiny black fly that will hover around the soil in the pot.  This insect is usually an indication of too much water. 

Propagation

Propagation is so simple. This is a wonderful first-timers project.    All you need is a mother plant, soil, scissors, water and some rooting hormone.  You may even try just take a cutting and place it in water. A cutting is taken from the mother plant with the top and at least two or three inches of stem.  Remove the lower leaves carefully so as not to tear the stem.  Dip the stem in water deeper than the nubs left over from the removed leaves.  Now dip into the rooting hormone to the same depth.  Place in soil that has been watered and you are done.  Be sure that you do not let the soil dry out and before you know it you will have a new plant.

This is the first time that I mentioned propagation of the plant I am talking about and I did so because it is one that you can share with all your friends and family.  Now is a good time to pick one up because gardeners use Coleus as annuals and are easily obtained from any garden center.  So go ahead and choose.  You can let it grow in the garden all summer and then propagate houseplants for your and your friends' homes.

I have added these pictures and more to the Pinterest Board Beautiful Foliage. If you have any questions or pictures of your own Coleus please email them to me at houseplantsos@gmail.com.