Showing posts with label houseplantsos.blogspot. Show all posts

Monday, November 25, 2013

A Fresh Cut Christmas Tree


This is the week of Thanksgiving, Black Friday and Fresh Cut Christmas Trees.  So as many of us go to buy our trees, I thought it would be a good idea to go over picking a good tree and how to keep it that way.

Plan Ahead


You should plan ahead.  Plan where your tree will be placed and move the furniture to be sure you can live with the arrangement  Know how big your tree should be. You would be surprise how many people buy a tree way too big for their house.  I remember sitting at my brother's house and looking around a giant tree to watch "It's A Wonderful Life".


Check For Freshness


Once you pick your tree, you will want to check the needles.  Firs are the trees of choice because they are known to keep their needles well.  The most common are Douglas, Fraser and Balsam. Of those, I like the Balsam best.  You could also mix it up with a long needle Pine.  What ever you chose, test the needles before you buy.  Grab a branch and brush the needles backwards.  If they don't pull free easily then you know the tree is still fresh.  Many Christmas Tree lots will give the bottom of the tree a fresh cut but if you have the ability to do it when you get home it would be much better and the tree will stay fresh longer. The reason is that the stem of the tree will start sealing over almost as soon as it is cut.  If you cannot cut it fresh, place your tree in very warm water when you get home. The sap will soften allowing the tree to drink. One hour later add enough ice to cool off the water. Cool water will make the tree think it is still winter and slow down its drinking. The cooler the tree the longer it will last.  Remember to keep it watered.  Do not leave the lights on when you go out and enjoy it when you are home.

Wreaths


Fresh wreaths will dry out and drop their needles quickly because there is no actual way to water them.  To make them last longer, keeping them cool is the answer.  Don't place your wreath between your front door and your storm door. The sun will heat that area very quickly.  Instead, put it on the outside of the storm door.  There are magnetic hooks that you can put back to back on both sides of the glass to hang your wreath on.  Inside, keep it away from the heat vents and where the sun will shine on it during the heat of the day.  You can try misting it regularly which will help to keep them cool.  If your wreath does dry out and there is still some holiday left, spray it with hair spray to keep it from dropping.  WARNING: this will make it more flammable than just letting it dry. 


Recap


Remember to review the posts from last year about caring for Poinsettias. I noticed a beautiful way to display your Amaryllis this this year.  You will need a tall glass container and pebbles to plant the bulb in. Add pebbles to the glass container and then the bulb with more pebbles half way up the bulb.  Add water. As the leaves sprout the tall sides of the container will keep them from falling over and the stem of the flowers will also have the extra support, keeping them fresher.  To top it off, it is a beautiful presentation.

That should cover it.  If you have any questions, please comment below or send me an email to houseplantsos@gmail.com.  Meanwhile, may you and your family have a Happy Thanksgiving.

Sincerely,
k.k.jones


Monday, November 11, 2013

Live Christmas Trees

Today we are going to talk about the Ball and Burlap (B&B) Christmas Tree which is a tree that still has its roots attached and wrapped in burlap. This type of Christmas Tree has lost a lot of favor over the years as so many people have paid a lot of money only to have the tree die. The main reason it dies is because most people forget that this is a large living plant and has special needs to keep it alive.


Will It Grow Here  

If you are considering a B&B Christmas Tree, it is because you want to plant in in your landscape. Most trees that are used for Christmas trees are northern trees.  Look around your neighborhood and more important the empty lots and see what is growing there. If you don't see trees that look like Christmas trees then you should probably not try a B&B.


What Happens After Christmas and How to Prepare

The next thing you need to think about when buying a Ball and Burlap Tree is where you are going to plant it when the holidays are over.  This is a decision that has to be made now because a hole has to be dug before the ground freezes.  Be sure to mark the hole so that no one steps into it. If it is up near the house this may be a good place to put your large blowup lawn ornament.  A tarp over the hole will help to keep the snow out and make it easier to clear it when it is time to plant.  There are many sites to go to for instructions on how to plant but the one I found with the most complete information is from the Delaware Christmas Tree Growers Association.

Even if you decide that you don't want to plant it until spring you will need to "heal" it in. This is placing a root ball in a shallow hole (burlap and all) and covering with a layer of soil and/or a lot of straw. The nice thing about this choice is that you don't have to decide now and any shallow hole will do.  How about in the back yard near the house?  Then you will not have to schlep a large tree through the snow and nearer the house should help to protect it. 


Containers?

Now, let's talk about what you are going to put the tree in.  You will need a big, I mean BIG tub.  I found a 16 3/4 gal galvanized tub at the Home Depot which is a pretty good size. It is also silvery and you may consider keeping it that color. If you want to paint and decorate, put that on the list of things to do now.  A muck bucket is a little smaller and can come is several colors. These are a little harder to find but they are plastic and will be easier to keep nice.    

Okay, we have a hole and we have a container for in the house.  Finally, it's time to talk tree. The most common Christmas Trees are the Balsam and Fraser Fir and the White Pine but if you are looking to add to your landscape, your choices are many. Talk to your local nursery for ideas.


Care of Your Tree

When you bring your Beautiful Christmas Tree home place it in the container you chose and put it in a sheltered location that is not heated.  You will still want it to get a little light so a covered patio would be a great location. It will need to stay there for at lease a couple days before you bring it into the house to acclimate itself to warmer temperatures and less light.  Be sure that the root ball does not dry out. Next, bring the tree into the house and be sure that it is not too close to a heat source.  There are two reasons for this. One is that the heat will make the tree dry out and more important you do not want the tree to completely break its dormant cycle.  If the tree is too warm for too long it will think that it is spring and there is a greater possibility for it to freeze when it goes back outside. Plan on keeping your tree in the house and decorated for a maximum of 5 days.  While it is in the house you will not have to fertilize but be sure to mist the root ball to keep it moist.  If your decorations will allow, go ahead and mist the tree also.  It will help to keep the tree cool.  

When you are finished enjoying the Christmas Tree put it back to the cool outdoor area for a few more days before you plant it in the landscape. Follow the directions you your nurseryman gave you to plant the tree and if the ground is not frozen yet be sure to water well.

Well, that's it.  The secret of having a live Christmas Tree is to remember that it is not an indoor plant.  Enjoy it and then put it back to where it belongs.  As we get closer to Christmas we will talk about keeping a cut tree alive.  If you have any questions, please be sure to email me at houseplantsos@gmail.com.  I would appreciate any comments.  Just add them below.

Sincerely,
k.k.jones


Tuesday, November 5, 2013

November 5

Winter is around the corner and it is time to revisit some of the information I gave you last year. If you have been reading my blog, you know that I posted a number of articles last fall on getting ready for the winter.  So rather than repeating myself, I thought I should give you a summary and tell you where to get more information.

You should have already brought your houseplants into a protected area with the intent of taking them inside. There are two postings from last September that are good references for bringing your plants back in as well as saving some of your favorite garden plants through cuttings. 

Green For Christmas

Begonias are easy plants to start from
cuttings and will root quickly
New plants from cuttings are inexpensive Christmas gifts and now is the time to get them started.  Even friends with 'not to green thumbs' love to get plants as gifts, especially if it is from someone whose gardening skills they admire. The post entitled Saving Your Favorites tell you how to make a Propagation Container to created new plants from cuttings. Choose something that they have admired in your home and trim just below a leaf nod. You will need at least one remaining leaf and one nod with leaf removed for a good cutting. The not with the leaf removed will be buried in your potting medium. Here is a link to a diagram showing the Parts of a Plant. You can see that the nod is where the leaf has emerged from the stem.  The bud right above the leaf is where the root will emerge. The amount of time to get a good root is between 4 to 6 weeks so don't wait. Of course you could use the new plants as boxing day gifts or if you want a little more show, start now for spring.

Red for Christmas

The poinsettias you saved from last year should be placed in a spot that will give them a full 10 hours of darkness.  They can take up to 7 weeks to develop buds. My favorite trick is to place the plant in the closet when you get home from work around 6 or 7 P.M. and take it out on you way to work around 6 or 7 A.M.  Check out my January posting So what are you going to do with your poinsettia now? for more detail.


The Legend of Poinsettias

A charming story is told of Pepita, a poor Mexican girl who had no gift to present the Christ Child at Christmas Eve services. As Pepita walked sorrowfully to church, her cousin Pedro tried to console her. "Pepita," he said, "I am certain that even the most humble gift, given in love, will be acceptable in His eyes." Pepita gathered a bouquet of common weeds from the roadside, for this was the only gift she could give. As she entered the chapel and approached the alter, her spirits lifted. Forgetting the humbleness of her gift, the girl laid the weeds at the feet of the Christ Child. Suddenly, Pepita's ordinary weeds burst into brilliant red blooms! This miraculous event was named the Flores de Noche Buena, or Flowers of the Holy Night. Today, we call these flowers poinsettias.

Today, Poinsettias come in a variety of colors and patterns and new ones are introduced every year.  Some of my favorites are Jingle Bells, Merry Christmas 2, Lemon Drop and Pink Elf.  Keep an eye out for them to shake up the usual at Christmas.


More Color, Give Me More Color

You should be feeding your Holiday Cactus as they are getting ready to put on their show.  Plant your Amaryllis Bulbs and your Paperwhites. If you haven't kept any bulbs from previous years, give yourself an early Christmas present.  These also make great hostess gifts for Thanksgiving. December 2012 postings will give you more information along with some great links on how to start and care for these plants.  

That's all for today.  Please comment on this post and tell me what you think. If I can help with any plant questions post them below or email me at houseplantsos@gmail.com . 

Sincerely,
k.k.jones


Sunday, September 29, 2013

Location, Location, Location

Location is Everything


Every good real estate agent will tell you how important location is and every good gardener will tell you the same. The location of your plant is as important as the location of your house and micro climates are found everywhere. 
 

Micro Climates


For today's lesson, I present to you two plants that are in my garden. They are a common house plant in many parts of the country so they are a good choice to study. The one in the picture on the right is healthy and happy. You can see another in the background of that picture and its close up is on the left. They are both the same kind of plant. They were both cut down in the spring to bare stalks so that that both would grow at the same rate. How come the second plant is not doing well? 


They are less than three feet apart and one is just a little farther north. You can almost say they are planted in the same location. They got the same amount of water and food, so what was different? It took me a couple days to observe that though they were so close one got more sun.  The other was shaded only 20 minutes more by the large tree next door and that made all the difference.

So, What Does That Mean to You, an Indoor Gardener? 


Just think, if just 3 feet outdoors can create a completely different micro climate then how little space is need to change it indoors. The 36 inch window will have a shadier side; the tub of artificial light is brighter in the center than the ends.  Then there will be the outside factors.  The tree outside the window, the direction of the sun, the neighbor's fence, a lot can effect you best laid plans. 

So take a second look at the location you have chosen.  There can be many reasons for a plant not to do well.  Start with the things you can control.  Is it getting enough water?  Is there any sign of infestation by bugs?  Has it outgrown its location?  Then take a good look at the actual location.  What quality of light is being offered?  How is the heat?  Is it too close or too far from the source?  Could a breeze be causing damage?  Could it be the lack of breeze?   

It doesn't take a college degree to grow houseplants.  It only takes a little observation.  So keep  your eyes open and keep trying. Write me if you have any problems.

Reach me through this website or email me at houseplantsos@gmail.com

Sincerely,
k.k.jones


Wednesday, July 3, 2013

Jasmine for Jennifer

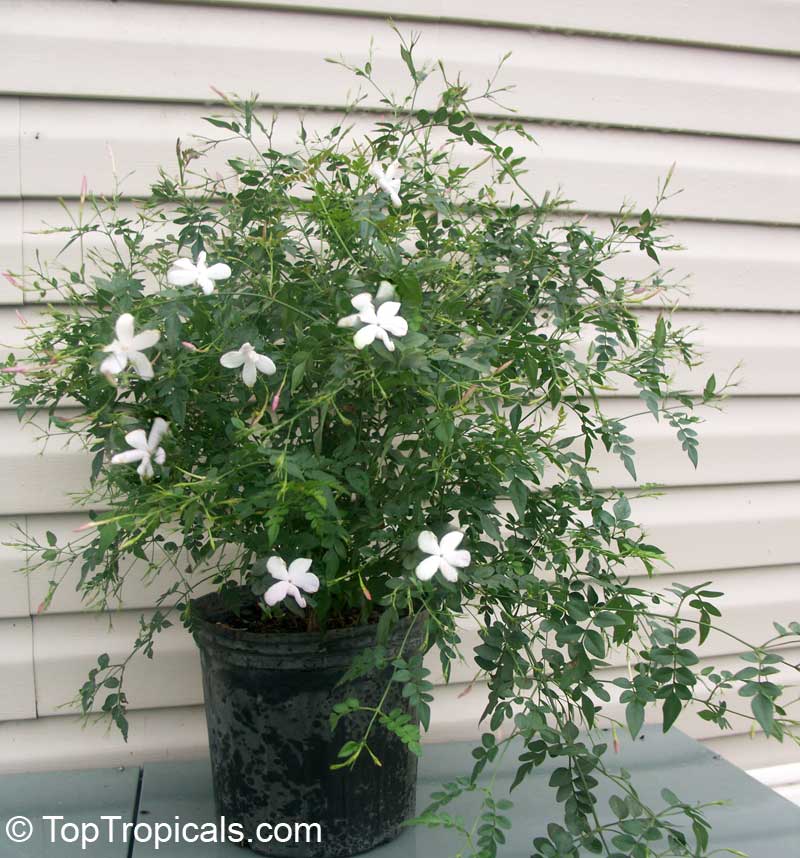
 One of my readers wrote that she had purchased a jasmine plant but could not get it to bloom.  So, here is probably the reason why.

How to Get a Jasmine to Bloom

Jasmine, though thought of as a tropical, like cooler temperatures.  To get it to bloom it will need night temperatures of around 40 degrees and day temperatures of 65.  This makes it a Spring bloomer naturally which also explains why my Jasmine is not in bloom and I had to borrow pictures from other sources.  I guess that means that your best bet to get your Jasmine to bloom now is to place it near the air conditioner.  

Jasmine also like sunny windows and are prime candidates for taking outside for the summer. The best time to prune is right after it has bloomed, as new flowers are formed on new growth.  Fall pruning may also cause you to miss blooms when it will re-bloom with the cooler temperatures.  

The Basic Care

I have already mentioned that the Jasmine likes a sunny location.  It will also do well under artificial light if you balance it with complete darkness.  Like most Spring and Fall flowering plants the amount of darkness they get helps to set the buds.

Watering is very important to this plant.  It should never be allowed to dry out.  Though you should be careful not to over water, this plant will do okay with a saucer to sit in.  

Fertilize lightly.  You should fertilize every other week with a half solution of low nitrogen fertilizer.  The nitrogen is noted by the first number in the fertilizer formula so a 10-20-10 solution would be best.  A 10-10-10 solution will do if you cannot find one, as this is a general formula for all plants. 

Hope this helps.  I will write again on the Jasmine and tell you more about it as there are 200 species. In fact when searching for a picture to put in this posting, I came across the picture of my "minature Gardenia" that I talked about in the posting "Catching Up On Odds and Ends". Looks like I will have to do a little more digging on that one.  If anyone knows which this is please write and I will share with others.

If you have any questions or pictures you would like to add to this blog please add to the comments or email me at houseplantsos@gmail.com.

Sincerely,
k.k.jones

Saturday, June 15, 2013

Catching Up On Odds & Ends

Strawberry Begonia

I added this picture and more to my Pinterest Board "Beautiful Foliage"
For the record, a strawberry begonia is neither a strawberry nor a begonia.  I do not know why it is called this except that it has a begonia looking leaf and it has marvelous runners like a strawberry that can grow up to two feet long.  

This plant is a Saxifraga Stolonifera which is an all together different family.  The runners make it a good grown cover in the frost zones between 7 and 10, but is favored as a houseplant because of it's beautifully marked foliage and the runners that will trail over the lip of a hanging pot. 

To grow inside, the Saxifraga Stolonifera likes a cool filtered sun.  It will grow in height to about eight inches.  You should feed it a standard fertilizer during the growing season.  Cut back on both fertilizer and water over the winter rest period.

Gardenia radicans?

 I have added some new pictures of this flower to

 my Pinterest Board "The Gardenias Are In Bloom".
Remember me telling you that the Gardenia is a large genus of plants?  Well here is one that I think is a good one to find.  As you see, the blossom is much smaller than the Gardenia jasminoides that I mentioned in a previous post.  This is a miniature Gardenia.  It grows in my neighbors yard and smells divine. Unfortunately, I am having difficulty finding out anything about this variety. It might be part of the radicans family but the ones I find on line do not have as many petals.  I am hoping that there is someone out there who might recognize it and tell us all more about it.  The plant is only about 3 feet tall which would make it a good plant for a conservatory or a large sunny window.  I will keep searching for answers.


I Guess I Know More Than I Thought

In February, I mentioned that sometimes plants do things that we don't think they should do.  My example was a flower stem of a phalaenopsis that I had cut off the plant after it was finished blooming.  I had stuck it in the dirt and to my surprise I watched it create two new buds.  I did not know what to think but hoped that the buds would become the beginning of plants, since I was sure that they could not really be flower buds.

Here is the update on this strange phenomena.  The buds dried out without producing anything.  Two more developed with the same results.  I finally removed the stem from the soil to see what was going on below and there was nothing.  So, my plant was the liar not me.  Do not let this discuorage you from trying something new.  My friend Rhona thinks that you can stick anything in the soil and it will grow.  Many times she is right.

Next time, we will talk about the wonderful world of colorful coleus.  These are great plants that can bring a myriad of color to the house. Until then, write me at houseplantsos@gmail.com or add any comments right here.


Thursday, May 9, 2013

Cleaning, Debugging and Fungus


Plants like this Draceana need to have the
whole leaf removed back to the trunk.

Summer is around the corner and when you start the deep cleaning of Spring you should not forget your plants.  Outside you are pruning dead branches and clean beds.  Inside you should be doing the same.  Plants need to be washed down, trimmed, re potted and checked over for infestation or disease. 

Start With Washing 

Most plants can be washed down with mild soapy water using dish detergent or Ivory Snow Laundry Detergent. Be sure to wash both the top and especially the bottom of each leaf.  The dust on the top effects the plants ability to use the sunlight and the bottom is where the plant breaths. Also, the bottom of the leaves are where bugs will usually lay their eggs.  Remove any dead leaves. Plants that have no leaf stems such as the Draceana marginata or the Draceana fragrans (corn plant pictured in a previous blog) should have the complete leaf removed back to the main trunk. This step is important because the crevices make great hiding places for bugs. Furry plants like African Violets can be turned upside-down and and gently swished in a bath of soapy water.  Before doing this, be sure to brush off any heavy dirt with a soft clean paintbrush and water to keep planting medium intact.  Light airy medium may have to be covered.  (You are only placing the upper plant in the water, no the whole pot.)  Place wet plant in an area that has a gentle breeze to help dry the leaves.  Do not put in the sun because the trapped water on the leaves will act as a magnifying glass and burn them.


What to Look For

This is the horror we sometimes find on our houseplants. There are two 
infestations here.  One is the Aphid  and the other is white fly.  This is
a beautiful Bougainvillea that has  been attacked.  Both of these bugs 
love tender new growth so the first thing to do is to cut off the new 
growth.  Be sure too dispose of all infested cuttings into a bag before
any of the bugs escape to new branches.
 
Long winters with dry heat are notorious causes of disease and infestation so as you are washing look for some of these tell tale signs.  Small black or grey spots may be the beginning of scale.  White cotton looking spots are mealy bugs.  Small hard to see webs very near the stem joints are spider mite webs.  Little green bugs that cover new growth and blossom buds are usually aphids.  I have included an image link for you to check out to see some pictures of common houseplant bugs .  From there you can link into different areas to learn more about what you may be encountering

Combating Infestation

Scale found on a Bromeliad.  This is very
hard to deal with as the scale will hide in 
all the little crevasses. This will take 
great diligence to eradicate it. It is 
probably best to find a clean pup (small 
growth on the side) that is not yet
affected and throw out the rest.  
The plants that are most affected by the infestation should be quarantined from the others and watched more closely.  Chemicals in the home should not be your first choice of action and many of these can bugs can be eliminated with a simple soap and water bath when caught early.   If you have scale, you may need to use your nail or a soft nylon brush to remove the outer shell encasing the bug.  Strong sprays of water will help knock the aphids off the infested plant.  (Be sure to do this over the sink or outside so that the aphids will not land on another plant.)  Spider mites hate moist conditions so after washing be sure to mist you plant every day.  Though simple soap and water will take care of most problems it should be noted that it is not a once and done situation.  You will need to take special care to watch for continued problems.  There are mild insecticides available at you local garden center for quicker results or if you have an infestation you cannot handle.  Please be sure to read the label on how to use and and take the precautions seriously before you use them. If you have found an infestation of one kind of bug you should look for more.  It just makes sense that if conditions are right for one bug it may be just right for another. 
This is scale on a Jade Plant.  The
fleshy leaves make it much harder to
spot.  The best treatment is a
systemic pesticide.

Disease

I don't have a lot to say about disease.  Many times it is caused by one of three things.  First and foremost is air flow.  Just like you, if plant does not get fresh air it will become more susceptible to virus and fungus.  This could be easily rectified by make sure you do not create the second problem which is over crowding.  Plants that are too close together will not get the circulation they need and also, become more prone to coming down with the same disease as their neighbors.  Lastly, fungus can be caused by poor watering practices.  Crown rot is very common in houseplants and this is caused by water sitting in the crown of the plant for too long. (The crown is the top of the plant were leaves emerge such as the African Violet.)  To help combat this, people are told to water plants that are prone to crown rot from the bottom and it works quite well.  Another way to combat disease from watering is to be sure that you water during the day so the plant has time to dry its leaves before nightfall.  Here again is the need for good circulation and no overcrowding.  You can see that these three causes of disease are all intertwined.  Break one rule and the whole system breaks.  If you do find yourself with fungus, a simple home remedy that I learned from my orchid people is cinnamon.  Cinnamon has fungicide properties but be sure that you do not use too much and smother your plant.  Safe fungicides are also available at your neighborhood garden center for your convenience.

That is all for today,  Hope this posting was helpful.  If you have any questions, be sure to add a comments or email me at houseplantsos@gmail.com . Sign up for my mailing list and you can easily receive each new posting.

k.k.jones


Monday, April 1, 2013

Happy Spring


Lilies, Hyacinths, and Tulips 


Spring Bulbs are showing up in the stores in full bloom.  They are beautiful and fill our homes with promise of the summer months to come.  With Easter coming so early, the lilies, hyacinths and tulips are the ones we will see the most of and  I thought we should talk briefly about these and how to care for them.

Lilies 

The lily is a tribe of plants called Lilium.  It has 2 large families called Oriental and Asia.  The lily that I have pictured here is called a Stargazer Lily and has become very popular over the years.  It is a  hybrid Lilium Oriental and is known for it's fragrant smell.  This lily usually blooms in the mid to late summer so if you have received one as a gift, there may be a possibility that you can get it to bloom again in the fall.

First you will have to let the plant complete the blooming. This plant wants full sun and will need to be put there to help feed the bulb.  With fertilizer, the blub may continue to bloom for a long time.  When it starts to look bad, stop watering and force the bulb into dormancy.  We have spoken before about how a bulb needs to rest so you know what to do.  If this is the first time you are reading my blog, cut off the faded greens and let the bulb rest in a shady area.

You can make your bulb bloom again inside but if you have a garden go ahead and plant it outside.  Lilies are hardy from zone 5 to zone 9.

Hyacinths 

The other heavy scented flower that you will see at this time of year is the hyacinth.  It's Latin name is Hyacinthum but you will rarely see this used.  It is a true spring bloomer and is easy to start from bulbs that you will buy in fall. 

If you get a hyacinth as a gift, give it lots of sun and do not over water it.  Plants that are over watered may collapse from the weight of their flowers. 

I have read that you cannot get a hyacinth bulb to bloom again but I have seen them bloom many times when planted in the garden.  This probably because they are fertilized when they are in the garden.  If you want to try to get a hyacinth blub to rebloom you will have to be sure that you fertilize.  The best time to do this is after the bloom and before the greens fade.  After they fade you can cut off the greens and repot in fresh soil.  The blub should be planted 3x the size deep and in soil that has good drainage.  Keep in a cool place and do not water until you see new growth. 

Tulips

Of all the flowers that you may receive as a gift this is one of the few that I will tell you to enjoy and then forget about it.  A tulip will continue to grow as it ages and so if you are picking you own tulips choose one with short stems.  Most of the tulips you will buy in bloom will have been forced. and it b is not one that you can easily rebloom after it has been forced.  If you want to keep the tulip bulbs you can find a place in your garden where they can regenerate unnoticed.  It will take two to three years before you see blossoms again.

 
I hope that this posting has answered any questions you may have.  If you have more, please post it here or email me at houseplantsos@gmail.com . I would love to hear from you.

Sincerely,
kkjones


Sunday, March 24, 2013

The Four Leaf Clover


The Luck of the Irish Be Yours


In honor of St Patrick, I thought I would talk about the extra special four leaf clover.  Yes, there actually is one.  It is a very uncommon variation of the common Trifolium repens which is a white clover.  The clover is part of a large species family that includes peas and other eatables.  Thought of as a nuisance in lawns, many of hours have been spent by children and adults alike looking for that elusive fourth leaf which is a symbol of good luck.

For those of you who do not know who St Patrick was, he is the person credited for bringing Christianity to Ireland and driving all the snakes out of the Isles. His holy day is March 17th and is celebrated by millions.  St Patrick's Shamrock is the 3 leaf as he used it to teach the Christian Trinity throughout Ireland.  But I get off the track.

The Shamrock Plant.


So what is that plant you are seeing in stores at this time of year?  This is called an Oxalis regnellii.  Its common name is Woodsorrel or False Shamrock Plant and it is a beautiful little plant.  Like the clover it is also eatable.  The Oxalis Regnellii does come in a four leaf variety as I picture below. I found it posted in a number of places on the web but cannot find another name for it.  If anyone knows the name please pass it on to me and my readers.

So now that you know what it is, let's talk about how to take care of it.

The Care and Feeding 

The Oxalis is grown from a bulb.  Knowing this you will know that the bulb will go through dormant periods so don't get upset if it starts looking peaked. 

Water the Oxalis sparingly.  Do not let it dry out as this will throw it into dormancy more quickly.  Do not over water or it will drown.  A pot and dish combination may be the best container for the Oxalis.  Feed it every 2 to 3 weeks with a fertilizer of 10-10-10.

Though the Oxalis likes a sunny window it does not like to be hot.   It does not tolerate temperatures over 75 degrees and would really like a lower temperature in the evening hours.  With this in mind you might want to keep your plant in a medium light location.

If your plant begins to go into a dormant period (usually in the heat of summer), stop watering.   Some people will force it into dormancy by cutting the whole plant down.  The older the plant the less it will need to go into dormancy.  While it is dormant let it rest in lower light and watch for new shoots.  When it is ready, you will see the shoots and you should then start the watering and feeding again.

I hope you find this posting helpful.  I try to use my own photography in this blog but today I had to rely on others. Thank you to them.

I hope that this posting has answered any questions you may have.  If you have more, please post it here or email me at houseplantsos@gmail.com . I would love to hear from you.

kkjones


Sunday, March 3, 2013

What is a Jewel Orchid?


A Beautiful Houseplant


Here is an orchid that is really worth looking at for a beginner indoor gardener.  It is called a Ludisia discolor and is one of the only orchids that is grown for the foliage and not its small white flower.


Flower is smaller than a dime

This orchid is so easy to grow that each grower has their own opinion on what kind of potting medium to grow it in. The Jewel Orchid is not like the last few orchids that we have spoken about.  It does not grow in trees; it grows on the ground.  So you need something a little heavier but still not just dirt.  My Jewel is in a good potting soil mix.  A mix means that there is organic material in the bag to help hold moisture but still allows air pockets for the plant to drain.  Some growers will tell you to create a mix of 1/3 soil, 1/3 peat and 1/3 bark.  There are also commercial potting mixtures available for just terrestrial orchids.


From Indonesia and Burma 

 
The Jewel Orchid is from the jungles of Indonesia and Burma so it likes a warm, humid environment.  Average day temperatures should be between 70 and 80 degrees.  I have read that night temperatures can go as low as 10 degrees but I don't think I want to try it. 
 
My Jewel Orchid likes a semi sunny location which helps to keep it warm.  It summers in a semi shady patio which is like a sunny window.  You should probably place your orchid in an eastern  window. 
 

Humidity

 
If you are not able to mist your Jewel Orchid twice a day then you should go with a humidity tray.  This is a tray that you put under your plant that is full of stones.  The tray should be larger than the pot that holds your orchid and has enough stones in it so that your orchid will not get wet when you fill the tray with water.  Water will evaporate and create a humid environment for any plant sitting on the tray.  This method works well with most orchids and you might want to consider a long shelf tray that could hold more than just one of your plants.  Just remember to keep the tray full and change the water now and then to keep it fresh. 
 

Propagation


Now for the fun part.  If you like this plant it is really easy to get more.  Just wait until you have a stem that is over 5 inches long.  Then cut the stem with at least 3 sets of leaves on it.  Remove 2 sets and place the cutting in a pot covering the area where you removed the leaves.  You will get better and quicker results if you purchase some rooting hormone to dust on the cutting before you put it in the pot.  Rooting hormone is available at most garden center.


 I hope you enjoyed this posting on the little known Jewel Orchid.  Though the leaves are beautiful I cannot help to notice the beauty of the tiny little flower with a sunny yellow lip.  I could not help but put in this last photo because of how it looks like the opening buds look like they are lit from within. 

Please send me any questions about your houseplants via this site or email me at houseplantsos@gmail.com . Send me any photos of plants you want answers for.  I will publish them and help you get any sick plants back on the road to health.

Sincerely,
k.k.jones

Monday, February 18, 2013

The Care of a Phalaenopsis Orchid

 .

Light Exposure

The Phalaenopsis orchid does not need a lot of sun and will be quite happy in an eastern facing window.  If you plan to place it in a western or southern window, I would recommend that you place it behind a shear drape or blind.  A good way of knowing if the lighting is correct is the shade of the leaves.  Dark green leaves say that the plant is not getting enough sun.  Be careful when you start adding light because the leaves will burn if they get too much sun.

Planting Medium

Your Phalaenopsis will usually come in one of two mediums (stuff that is in the pot).  One is a combination of bark and charcoal.  The other is peat moss.  Both of these mediums will hold water for the orchid's use and allow the roots to be free of too much water.  It is important that the roots not sit in water for any length of time or the orchid will drown.  If you find that your medium has dried out sit the pot in warm water for about 20 minutes and then drain completely.

Watering

It is best to water all your orchids in the morning.  This is important especially for the Phalaenopsis because of its leaf formation.  The leaves come out from the center and create a cup that holds water when it is misted and it loves to be misted.  If the plant does not get a chance to dry off by nightfall it could be exposed to a fungus called crown rot.

Depending on the humidity of the plant, water your Phalaenopsis from twice a week to every day.  Water and let drain.  Check the medium for moisture and mist any exposed roots. 

More Information

There is so much I could tell you about the Phalaenopsis that I am just not sure where to stop.  So here is just a little more information to get you started.  If you have any questions I did not answer just ask.

Cinnamon is a known anti-fungal and have been sprinkled on plants to kill active fungus.  This should be done with care because if it is too thick on your plant it will interfere with the photosynthesis. 

I have learned a watering tip from an orchid grower when I received a new Phalaenopsis for my wedding.  This is simple and easy for all us busy gardeners.  One or two ice cubes in the pot will slowly melt and water the roots.

Mature Phalaenopsis Orchids can develop bloom spikes two to three times a year and blooms can last up to six months. As you learned last week, there is a possibility that an old spike will through off a new spike and bloom again.

Thanks for reading this blog.  I hope that it has been helpful.  Please give me some feedback.  Any questions can be added to this blog or sent to me at houseplantsos@gmail.com .

Sincerely,
k.k.jones

Sunday, February 10, 2013

The Plant That Called Me A Liar

 I have always felt that no matter what I tell you about plants there will be one stubborn plant that will call me a liar.  If I tell you it likes the sun, your plant will tell you it likes only partial sun.  If I tell you that a plant should do one thing, it will do the opposite.  But I can explain that.  Plants are living, breathing entities.  Each plant is a little different.  Each has its own "personality".

Here is my newest independent thinker.  This is a Phalaenopsis Orchid.  For those of you who do not know what a Phalaenopsis is I have added a picture of the bloom so you will recognise it.  The plant is usually made up of large leaves near the pot and then flowers form on a long spike towering over them. After the blossoms fall I have always been taught to leave the long empty stalk on the plant until it grows brown because the green stalk is full of nutrients that the plant will continue to use for the next blooming.  Sometimes, though I have not seen it very often the stalk will send off a side stalk and will bloom again.  Usually, it just sits there looking ugly.  So what the heck, I cut it off and stuck it in the dirt of a large plant to see what would happen.

Well, I did do a little more than that.  I started with three stalks.  Cutting them just under a flower node, I dusted them with rooting hormone and then I stuck them in the dirt.  I did not expect anything.  I watched two of the stalks turn brown and waited for the third to follow suit.  You can imagine my delight when it did not turn brown but developed buds.   Phalaenopsis are not suppose to like dirt.  They like their roots to be able to breath in moss or bark or coconut fiber.  I am not sure how this will turn out.  It is not wise to disturb the roots of a flowering plant so I cannot tell you what is happening down there yet. But I will keep you posted.

Next week I will tell you about the care and feeding of the Phalaenopsis Orchid so stay tuned.  I hopefully will have an update on my buds. 

Please tell me about your plant and its unusual behaviour.  Send me photos that I can post here along with your story.  You can post them yourself on this blog or email me at joneskathee@gmail.com

Until next time,
k.k.jones